THEIA-CAM™ | THSCJ101 | 13MP PDAF Camera for Jetson Orin
Start Guide
Items You Need
THSCJ101 THEIA-CAM™

THSCJ101 Kit

JNX42-M.2 from Auvidea GmbH
JNX42-M.2 Carrier Board with:
Peripheral Hardware
Display with HDMI Cable
USB Mouse and Keyboard
Ethernet Cable (for Internet Access)
Micro-B USB Cable (To connect with PC)
Binary Files
Jetson Orin NX Desktop | 2 files (yellow-circled) are needed in Desktop.
THSCJ101 Linux Driver Binary
thp7312-imx258-driver-binary.tar.gz
This file is in THEIA-CAM_J101_BINf .zip
THine ISP (THP7312-P) Firmware Binary
thscg101_thp7312.bin
All files are available upon request, by checking the “THSCJ101” check box(es) and filling out your project information. We will respond as soon as possible.
Note: THSCJ101 is shipped from factory with Firmware preloaded. It is highly recommended to upload the Firmware during the first setup, which step is included in this Start Guide.
Computer for Terminal Emulation (PC)
We use Windows 10 Computer in this page.
You need one of following Terminal Emulators installed. In this page, we use PuTTY.
PuTTY | Download Page
TeraTerm | Download Page
Unless you have, install VCP Driver.
FTDI Chip | VCP Driver | Download Page
Step Overview
Preparation
Get all required items
Install Jetson Linux
Set up Account of Ubuntu on Jetson Orin NX
Copy Binary Files into Jetson Orin NX Desktop
Set up THSCJ101 THEIA-CAM™ with Jetson Orin NX
Set up Jetson Orin NX Hardware
Log in Linux on Jetson Orin NX
Set up THSCJ101 THEIA-CAM™ Driver Binary
Install V4L2 Utilities and Gstreamer
Program THine ISP Firmware Binary
Stream 4K at 30fps Camera View
1. Preparation
1-1. Get all required items
All items of hardware are available on line. Contact us for Binary files.
1-2. Install Jetson Linux
Connect HDMI display cable to J9.
Connect USB mouse and USB key board to J6.
Connect LAN cable to J3.
This is to get software from Internet.
Connect Power Adapter to J1.
Power on the Jetson Orin NX carrier board.
Follow the steps in Auvidea Software Setup Guide to install Jetson Linux.

Auvidea Jetson Orin NX Carrier Board | Connect items red-circled.
1-3. Set up Ubuntu Account on Jetson Orin NX
Set up your account information for Ubuntu on Jetson Orin NX.
Note: Do not change the partition size.
1-4. Copy Binary Files into Jetson Orin NX Desktop
Copy the following files into Jetson Orin NX Desktop. The files are available upon request. You can use USB Flash Drive or Internet drive for your Jetson Orin NX to get those files.
THSCJ101 Linux Driver Binary
thp7312-imx258-driver-binary.tar.gz
This file is in THEIA-CAM_J101_BINf .zip
THine ISP (THP7312-P) Firmware Binary
thscg101_thp7312.bin
Power off the Jetson Orin NX to set up THSCJ101 THEIA-CAM™ to the Carrier Board.
README.txt for ISP Firmware Binary | You can find the version number (90.04 in this case).
2. Set up THSCJ101 THEIA-CAM™ with Jetson Orin NX
2-1. Set up Jetson Orin NX Hardware Set up
Set the DIP switch of THEIA-CAM as follows.
#1 OFF
#2 OFF
#3 OFF
#4 ON (Programming Mode)
Connect the FFC for THEIA-CAM™ Camera Board to J5 connector.
Pull up the black actuator of the J5 to release the connector lock.
Contacts are board side.
You may want to loosen the screws to pull up the Jetson Orin NX Module for easier access to the J5 connecter.
Connect Micro B USB cable for PC after the login prompt is displayed on the HDMI display.
You might need to connect the USB cable after the login prompt is shown in the display if you cannot see the L4T-README window.

THSCJ101 THEIA-CAM™ Camera Board | DIP Switch Configuration for Setup
Jetson Orin NX Module & Auvidea Carrier Board | Connections Overview

THSCJ101 THEIA-CAM™ | FFC pins to face the board
2-2. Log in Linux on Jetson Orin NX
The following steps are done through PC.
PuTTY Icon
Launch Device Manager in Windows and check COM port number.
To find the App, type in “device manager” in Windows search bar.
COM port number is found in Ports (COM & LPT).
Launch Putty.
You may need to install VCP driver, by downloading from http://www.ftdichip.com/Drivers/VCP.htm
Select Session in the Category and configure as follows:
Serial line to be COM<N>
The <N> should be the same as the number found in Device Manager.
Connection type to be Serial.
Speed to be 115200.
Click Open button. PuTTY displays the terminal window.
Log in using your user name for the Jetson Orin NX Computer.
Entering password may be required.
Device Manager | You can find the COM port number in Ports (COM & LPT) section in Device Manager.
PuTTY | The Serial line should align with what your Device Manager tells you. In this case, COM3.
PuTTY | Login Window
PuTTY | After Logging In
2-3. Set up THSCJ101 THEIA-CAM™ Driver Binary
The following steps are done through PuTTY in PC.
Double check the following file is in Jetson Orin NX Desktop:
thp7312-imx258-driver-binary.tar.gz
In PuTTY window, change the working directory to Desktop (or where the file is placed).
cd Desktop
Unzip the tar file on the terminal with the following command.
tar -xvzf thp7312-imx258-driver-binary.tar.gz
Change the working directory to the unzipped file, and unzip the thp7312-imx258-modules.tar.gz
cd thp7312-imx258-driver-binary
tar -xvzf thp7312-imx258-modules.tar.gz
Copy the following unzipped files to the designated directory as follows:
Kernel
sudo cp ./Image /boot/
Device Tree
sudo cp ./device-tree/tegra234-p3767-0000-p3509-a02.dtb /boot/dtb/kernel_tegra234-p3767-0000-p3509-a02.dtb
sudo cp ./device-tree/tegra234-p3767-camera-p3768-thp7312-imx258-dual.dtbo /boot/
Modules
sudo cp -r ./5.10.104/ /lib/modules/
sudo ln -s /lib/modules/5.10.104 /lib/modules/5.10.104-tegra
Display Modules
sudo mkdir /lib/modules/5.10.104/extra
sudo mkdir /lib/modules/5.10.104/extra/opensrc-disp
sudo cp ./opensrc-disp-modules/nvidia*.ko /lib/modules/5.10.104/extra/opensrc-disp
Double check the following file is in Jetson Orin NX Desktop:
thscg101_thp7312.bin
Change the working directory to Desktop (or where the file is placed).
cd Desktop
Make /lib/firmware/thine directory to place the firmware binary in.
sudo mkdir /lib/firmware/thine
Copy the firmware binary to the directory.
sudo cp ./thscg101_thp7312.bin /lib/firmware/thine/thscg101_thp7312.bin
Reboot the Jetson Linux
sudo reboot
Note: PuTTY displays an Error message and the window becomes inactive.
Close inactive PuTTY, launch a new PuTTY window, and log in after L4T-README pop up message is shown in Windows.
PuTTY configuration (Serial line, Speed, and Connection type) may need to be set again.
When logging in, entering password may be required.
Note: The Display for Jetson Orin NX may keep black out until the next rebooting step.
Rebuild the module dependency.
sudo depmod -a
Apply the device tree overlay by running the jetson.io script.
sudo /opt/nvidia/jetson-io/jetson-io.py
Select the following items in the jetson.io script.
Configure Jetson 24pin CSI connector
Configure for compatible hardware
Camera THP7312/IMX258 Dual
Save pin changes
Save and reboot to reconfigure pins
Press any key to reboot and wait until the reboot is complete.
Note 1: PuTTY displays an Error message and the window becomes inactive.
Note 2: The Display for Jetson Orin NX may repeat getting back on and black out for a few times before becoming stable.
Note 3: It may take a few minutes to ~10 minutes for Windows to show L4T-README pop up message to show.
Close inactive PuTTY, launch a new PuTTY window and log in after L4T-README pop up message is shown in Windows.
PuTTY configuration (Serial line, Speed, and Connection type) may need to be set again.
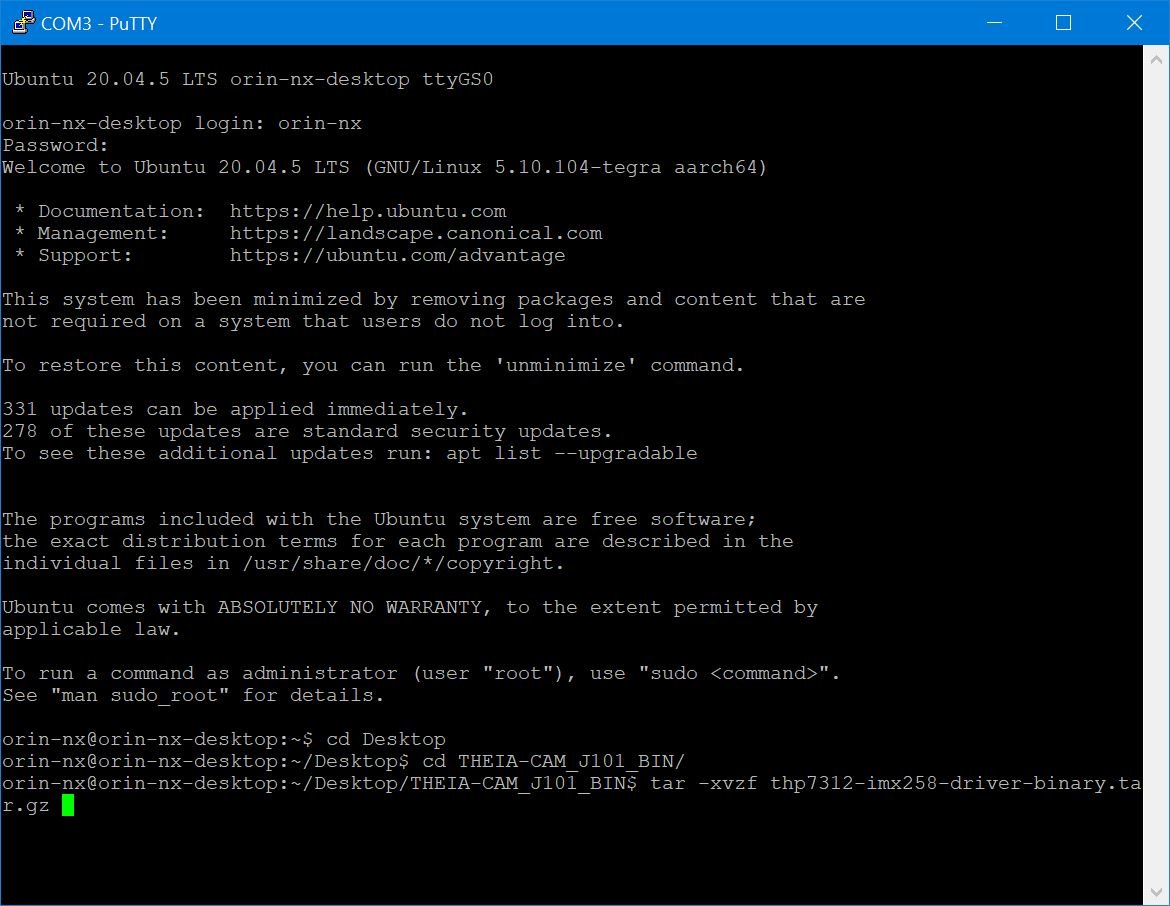
PuTTY | Extracting thp7312-imx258-driver-binary.tar.gz

PuTTY | Extracting thp7312-imx258-modules.tar.gz
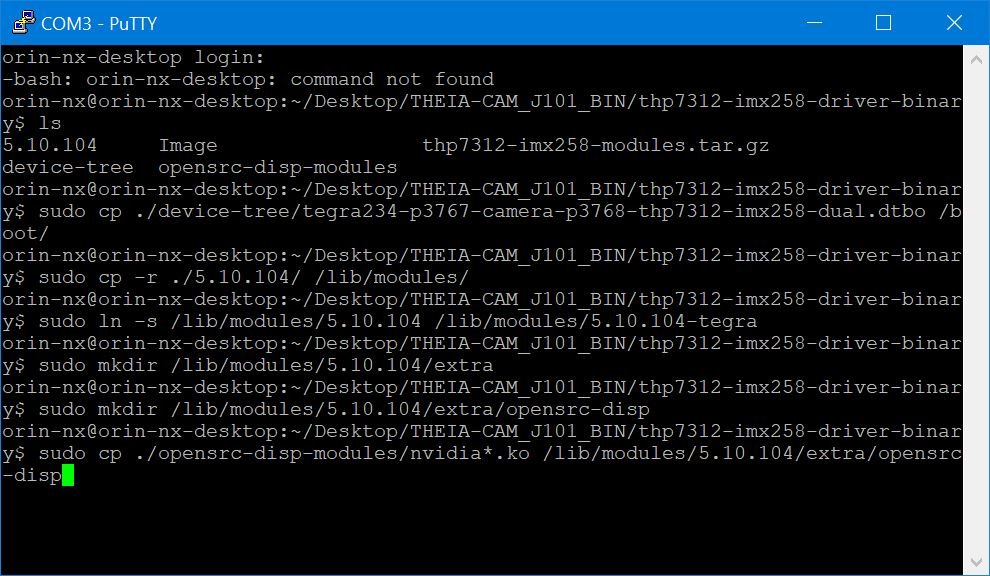
PuTTY | Making directories and copying files
PuTTY | Rebooting after placing thscg101_thp7312.bin
PuTTY | Applying the device tree overlay
PuTTY | Finishing the jetson.io script
2-4. Install V4L2 Utilities and Gstreamer
The following steps are done through PuTTY in PC.
Install V4L2 utilities.
sudo apt-get update
sudo apt-get -y install v4l-utils
Install gstreamer.
sudo apt-get install gstreamer1.0-tools gstreamer1.0-alsa\
gstreamer1.0-plugins-base gstreamer1.0-plugins-good \
gstreamer1.0-plugins-bad gstreamer1.0-plugins-ugly \
gstreamer1.0-libav
sudo apt-get install libgstreamer1.0-dev \
libgstreamer-plugins-base1.0-dev \
libgstreamer-plugins-good1.0-dev \
libgstreamer-plugins-bad1.0-dev
PuTTY | Installing V4L2 utilities
PuTTY | Installing gstreamer
PuTTY | Enter Y to continue
2-5. Program THine ISP Firmware Binary
The following steps are done through PuTTY in PC.
Program the firmware binary.
v4l2-ctl -d /dev/video0 --set-ctrl=isp_firmware_update=1
Wait about 35 seconds and check the if the Terminal says THP7312 Firmware update is completed.
sudo dmesg | grep 7312
Set the DIP switch of THEIA-CAM as follows.
#1 OFF
#2 OFF
#3 OFF
#4 ON (Streaming Mode)
Reboot the Jetson Orin NX.
sudo reboot
Wait until the reboot is complete.
Close inactive PuTTY, launch a new PuTTY window and log in after L4T-README pop up message is shown in Windows.
PuTTY configuration (Serial line, Speed, and Connection type) may need to be set again.
Check the firmware version. It will show THP7312 Firmware version (e.g., 90) and subversion (e.g., 4). Confirm with README.txt enclosed with the
sudo dmesg | grep 7312 | grep Firmware
Close the PuTTY window. PC is no longer needed for the following steps.
PuTTY | After half a minute, check if the update is complete.
PuTTY | Firmware update is complete.
THSCJ101 THEIA-CAM™ Camera Board | DIP Switch Configuration for Video Streaming
PuTTY | ISP Firmware version showing 90.4
2-6. Stream 4K at 30fps Camera View
The following steps are done through Jetson Orin NX without PC.
THEIA-CAM™ | How to remove Camera Module Protection Film
Remove the protection film on the camera module.
Login to the Jetson Orin Linux.
Enter the following command to stream 4K 30fps image.
v4l2-ctl -d /dev/video0 --set-ctrl sensor_mode=3
gst-launch-1.0 v4l2src device=/dev/video0 ! video/x-raw,format=YUY2,width=3840,height=2160,framerate=30/1 ! xvimagesink
You can see the streaming images on the display.
For futher V4L2 commands, see the V4L2 Command Manual.
-
The V4L2 driver consists of multiple sub-device drivers. We need to configure the sub-device drivers before streaming images. This is called the pipeline configuration of the V4L2 driver, defined by Linux.
The following commands configure the connection of sub-device drivers and image format as the pipeline configuration of the V4L2 driver.
-
Set the sensor_mode of THSCJ101 recognized as "/dev/video0" in Linux to 3 which is the setting of 3840 x 2160 at at 30fps output.
-
Request gstreamer which is one of the Linux applications to output the YUY2, 3840 x 2160 at 30fps streaming images of "/dev/video0" to the "xvimagesink".
The "xvimagesink" passes the streaming data to the display program to show the streaming in the display.
Jetson Orin NX Desktop | Use Terminal to stream THSCJ101 THEIA-CAM™ camera images.
Jetson Orin NX Setup and THSCJ101 THEIA-CAM™ | Showing 4K camera video streaming
What’s Next
Now that your THEIA-CAM™ works with the Auvidea’s Jetson Orin NX Carrier Board, you can integrate the V4L2 Driver into your own system and start using the V4L2 Driver using the following documents.
THSCJ101 Resources
Start Guide (This Page) | Start Guide PDF Version
Following items are available upon request via the Request Form:
Related Pages
Image Quality Report | THSCU101 Image Quality Report | THine Solutions, Inc.
THP7312-P Press Release | THine Introduces a Standalone ISP and Firmware Development Tools to Stream Uncompressed 4K 30fps Video | THine Solutions, Inc.
Whitepaper | Design Trend for Embedded Vision Systems that Include High Performance Cameras | Katsumi Kuwayama | THine Solutions, Inc.
Blog | Upgrade to PDAF for Best Auto-Focus Experience! | Tak Iizuka | THine Solutions, Inc.
